Put your new website on your domain at Hostinger (cPanel)
About 15 minutes. You change three settings at Hostinger (cPanel). Your domain stays where it is and your email keeps working. Your panel checks each setting for you as you make it.
You need the email and password of your Hostinger account, the one you use to pay for your cPanel hosting. You do not need a separate cPanel password: Hostinger opens cPanel for you. Keep your SiteSmith panel open in another tab, so you can copy your site's address from its Domain tab.
The three settings
| Type | Name | Value |
|---|---|---|
| CNAME | www | your site's address — copy it from the Domain tab of your panel |
| A | @ | 137.66.50.77 |
| AAAA | @ | 2a09:8280:1:0:0:1a0:bb93:0 |
@ means the domain itself; some screens call it the "host" or leave it blank. Leave every other setting exactly as it is: your email depends on them.
Step by step
Log in to Hostinger
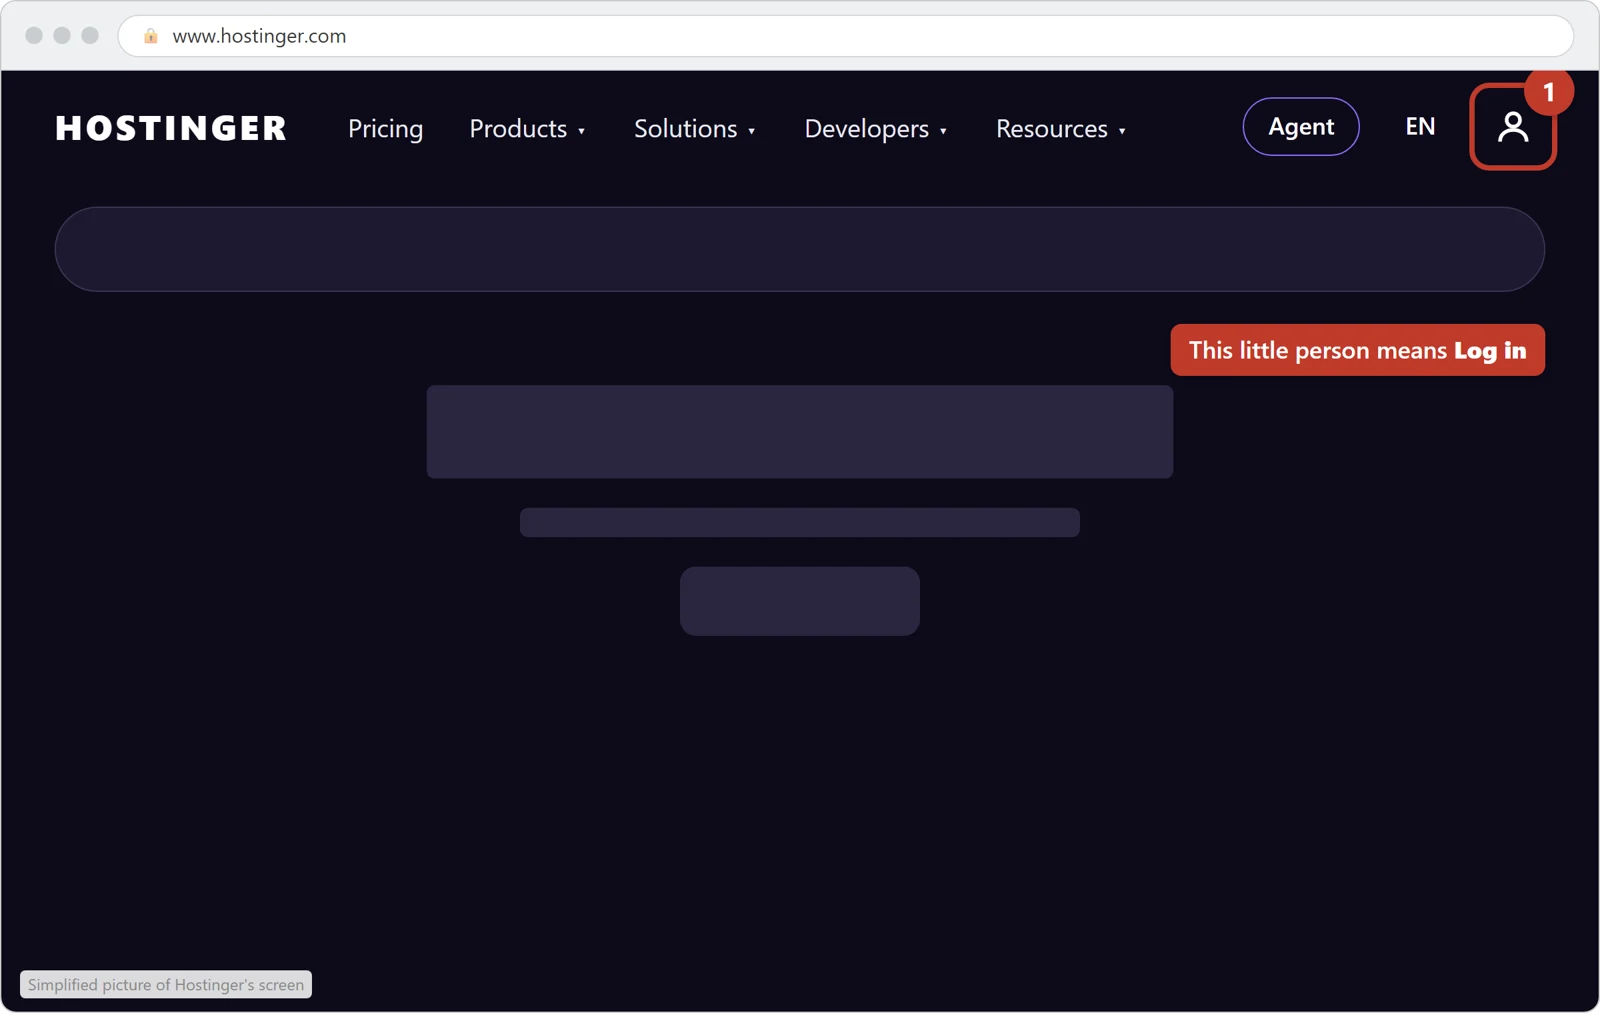
Go to hostinger.com and click the little person at the top right. It means Log in. Sign in with your Hostinger email and password. Your Hostinger dashboard opens on its Home page.
Tap the picture to see it bigger. Open your cPanel hosting
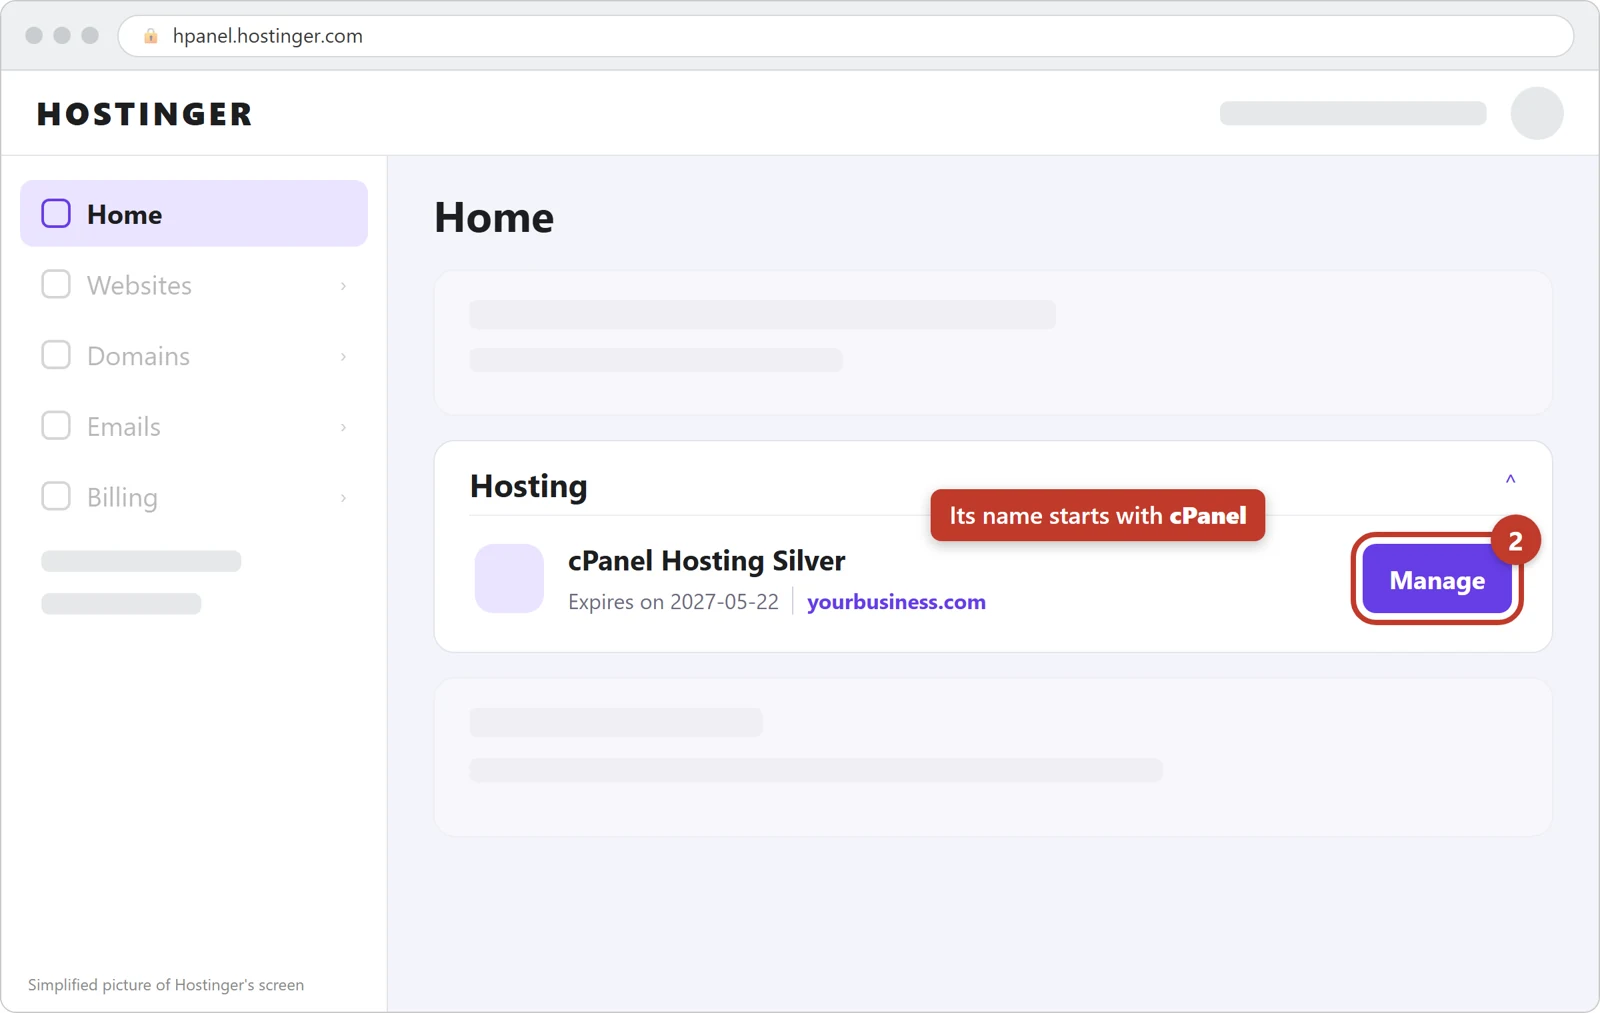
On the Home page, find the box Hosting. Your plan is listed there, and its name starts with cPanel. Click Manage next to it.
Tap the picture to see it bigger. Open cPanel
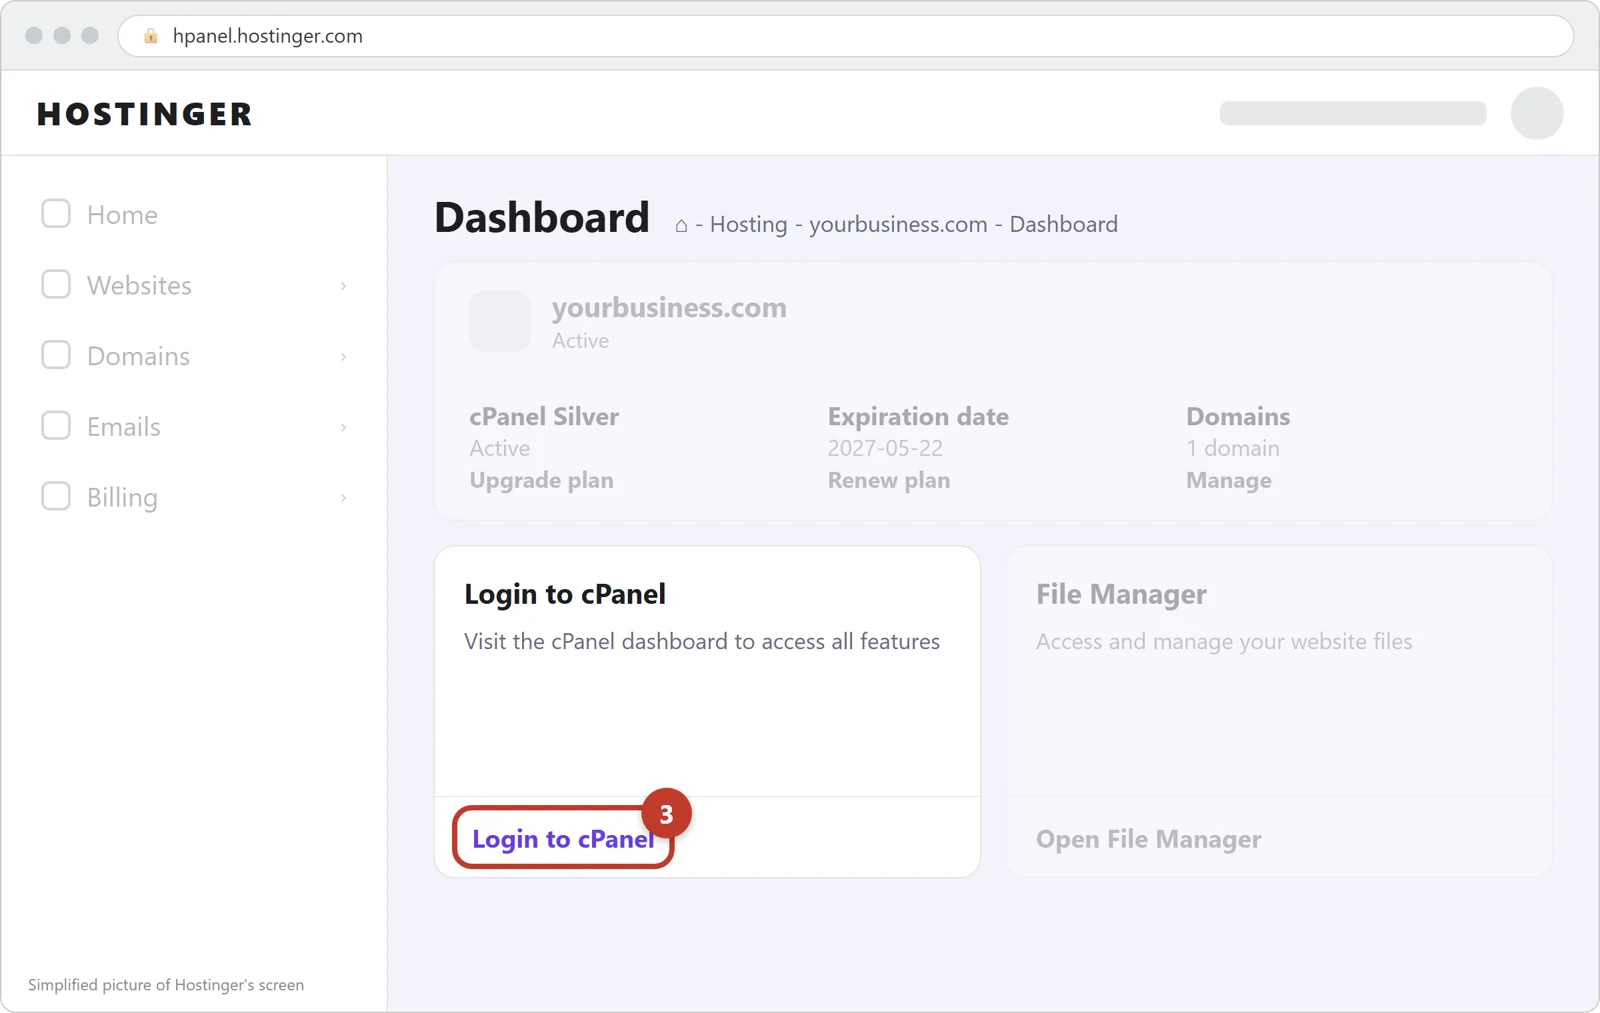
Your hosting's Dashboard opens. Click Login to cPanel. cPanel opens without asking for another password. It looks different from Hostinger's own screens; that is expected.
Tap the picture to see it bigger. Open the Zone Editor
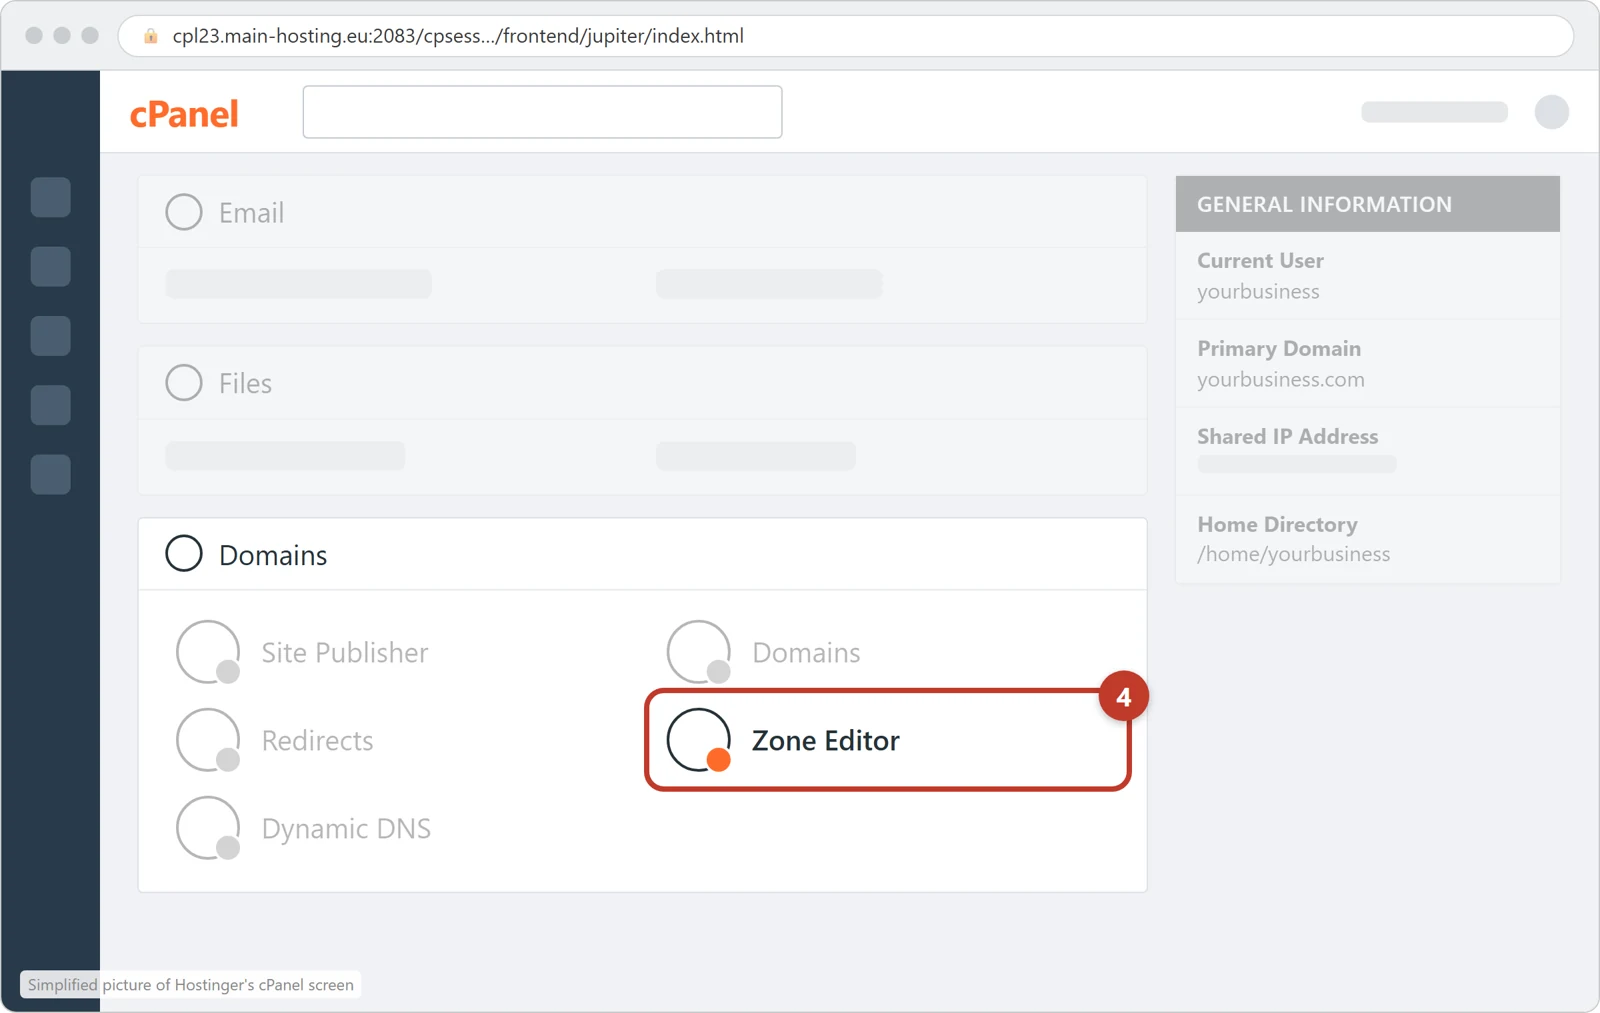
Scroll down to the section called Domains. Click Zone Editor.
Tap the picture to see it bigger. Click Manage next to your domain
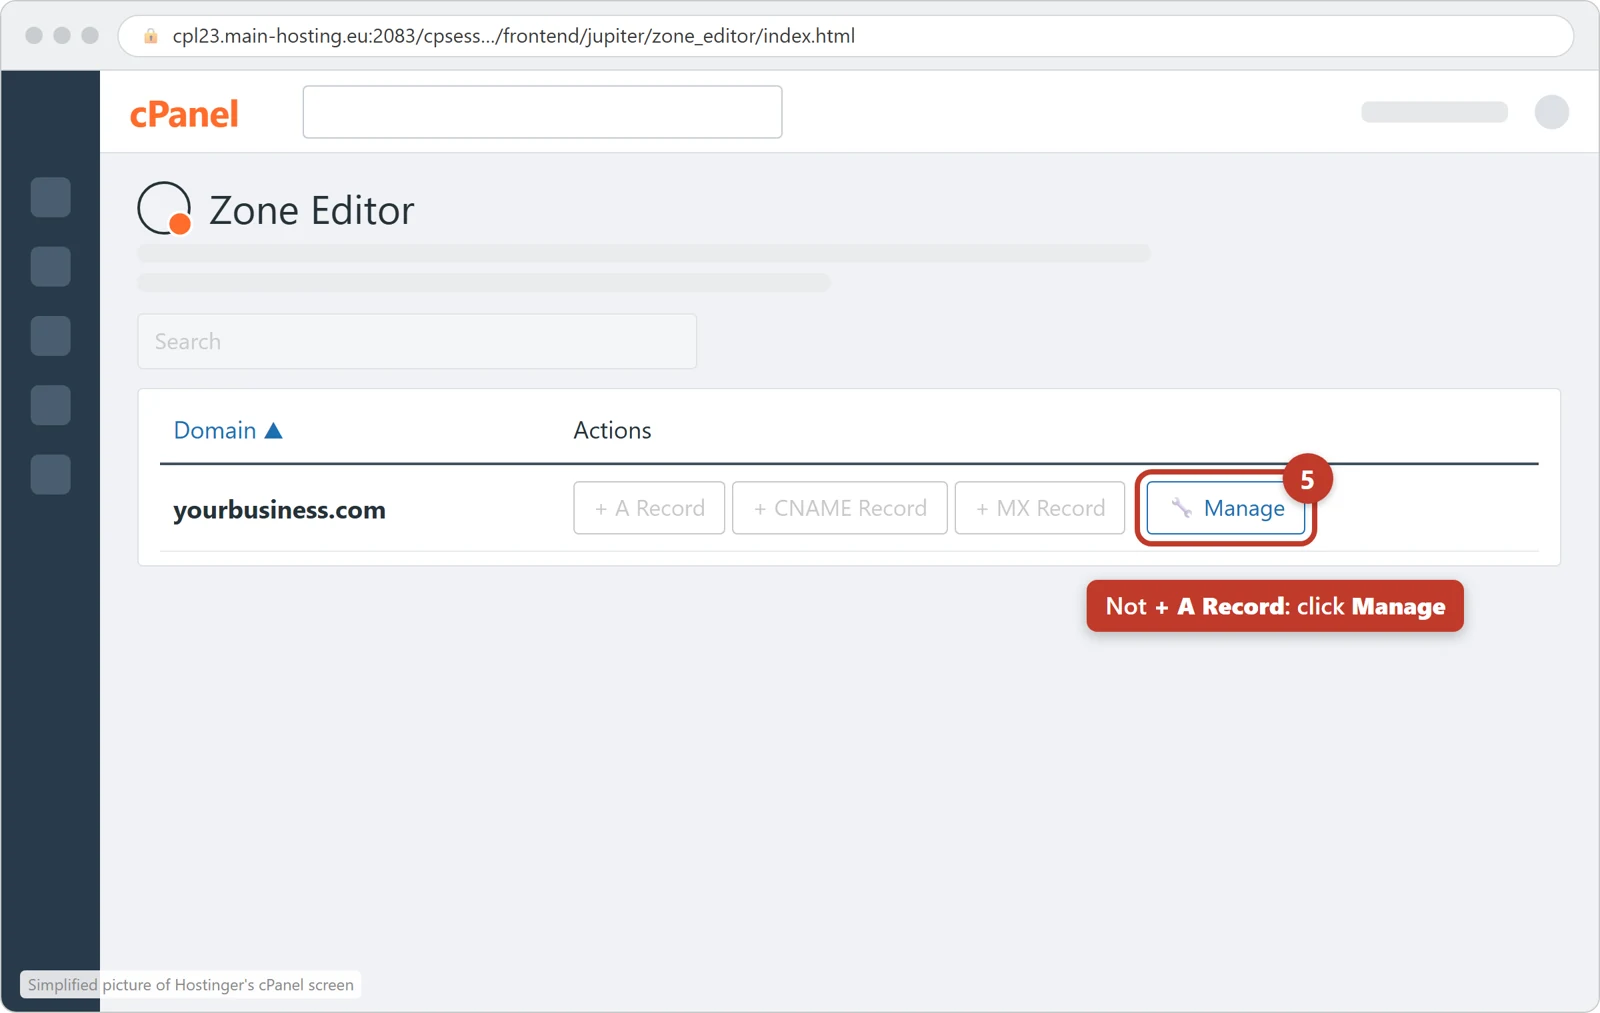
You see your domain with a row of buttons next to it. Click Manage, the last button. Do not use + A Record here: it would add a second line instead of changing the one you have. A list of your domain's settings opens; cPanel calls each line a record.
Tap the picture to see it bigger. Open the www line
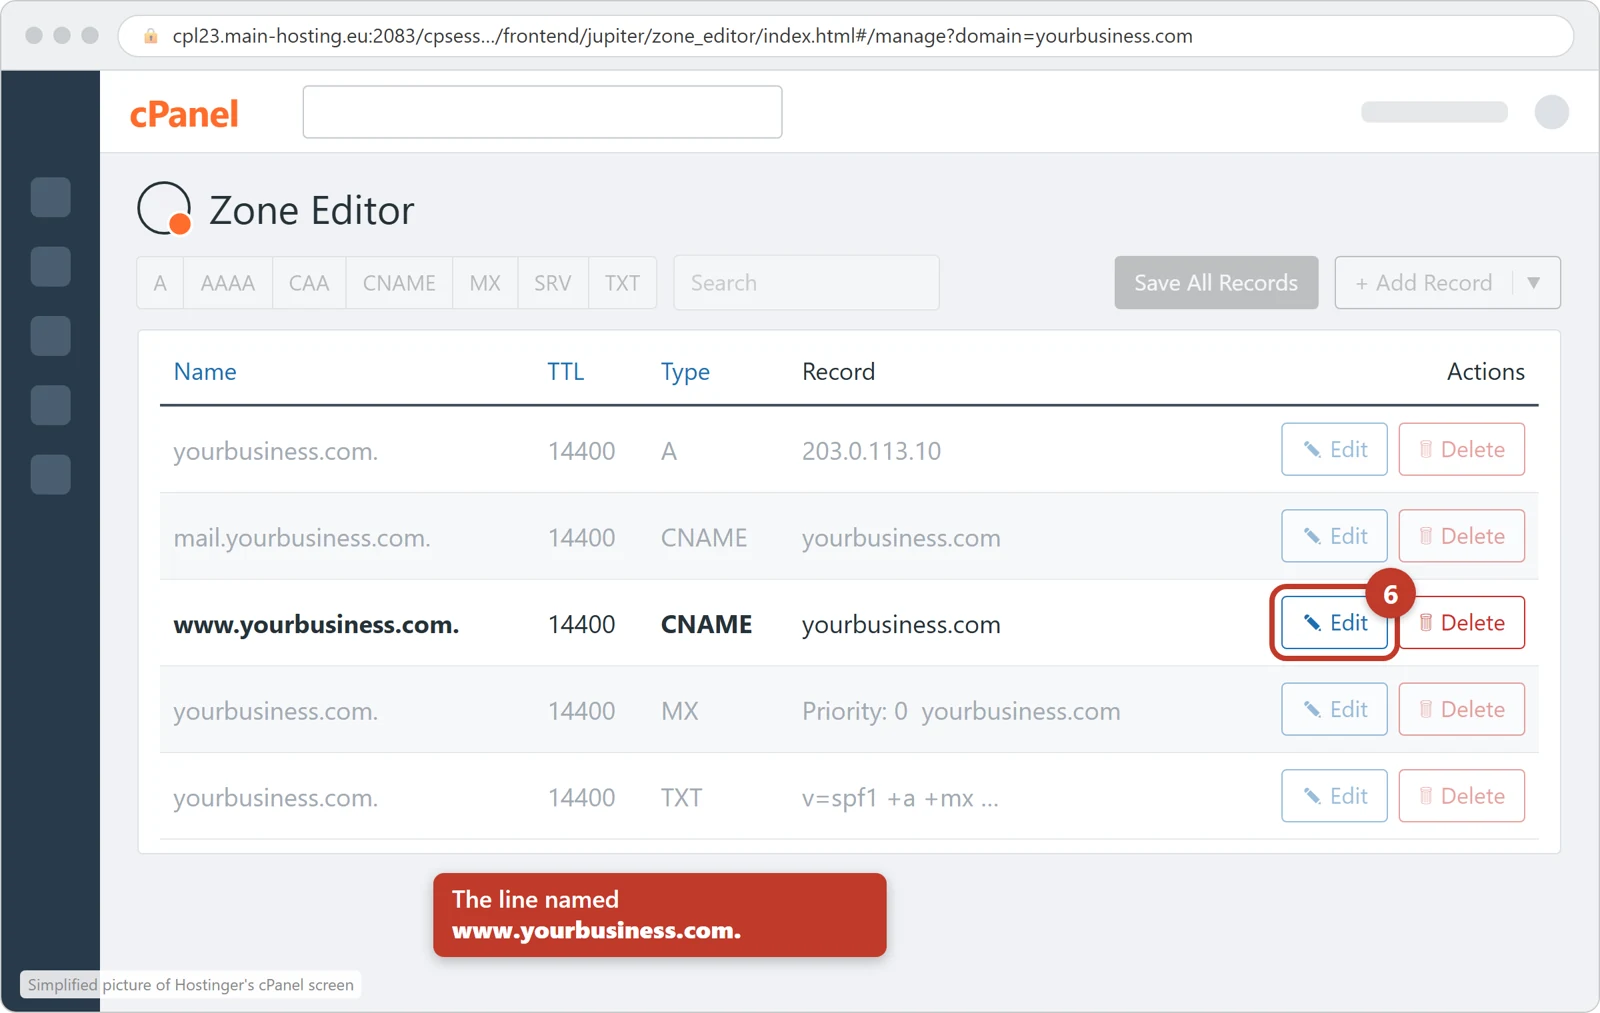
Find the line whose Name is www. followed by your domain, with CNAME under Type. Its Record is usually your own domain name. Click Edit on that line. The line turns light blue, with boxes you can type in.
Tap the picture to see it bigger. Change the www line
In the Record box, delete what is there and paste your site's address from the Domain tab of your panel. Leave Name and TTL as they are. Click Save Record.
Does the www line say A under Type instead of CNAME? Then, in the same light-blue line, choose CNAME in the Type box first, then paste the address and click Save Record.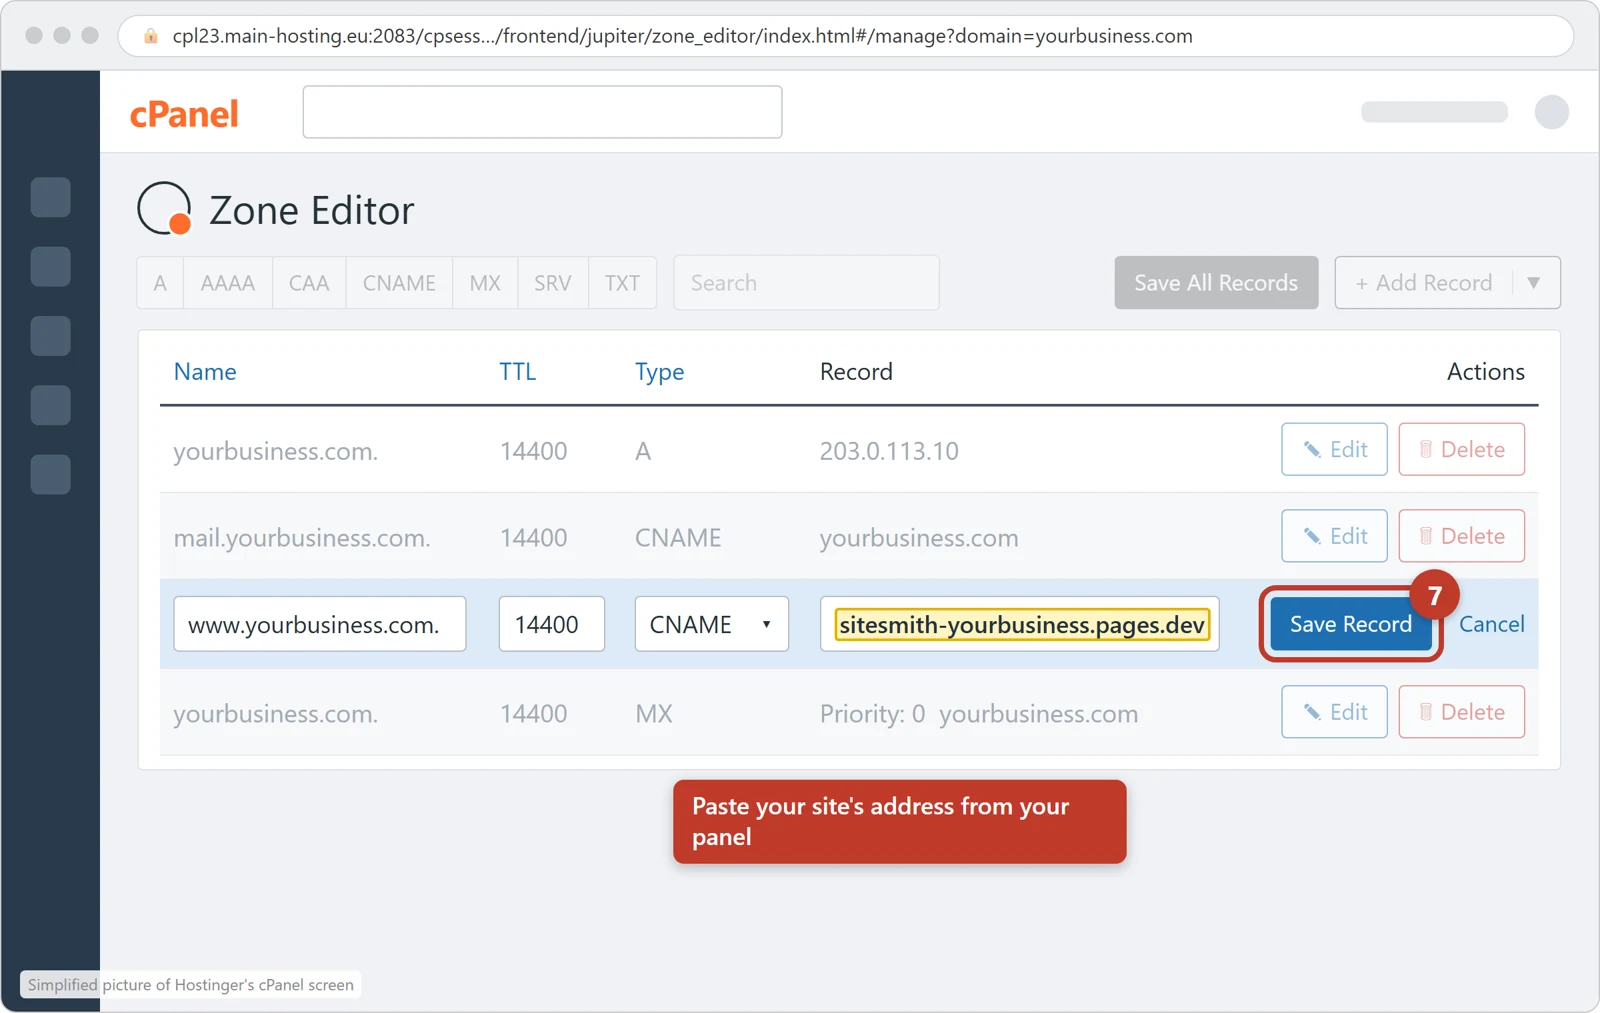
Tap the picture to see it bigger. Is your email at Hostinger? Look at your panel first
At Hostinger's cPanel, email usually arrives through your domain itself. If the Domain tab of your panel asks you to set only the www record for now, stop here and go to the last step. We contact you about your email before the other two. If your panel does not say that, go on.
Change the A line for the domain itself
Find the line whose Name is your domain with nothing in front of it, like yourbusiness.com., and A under Type. Click Edit on that line. In the Record box, delete the numbers and paste the A address from the table above. Click Save Record.
Two A lines with that name? Change one, then delete the other: Delete, then Continue. Leave lines with other names, like mail, ftp or webmail, as they are.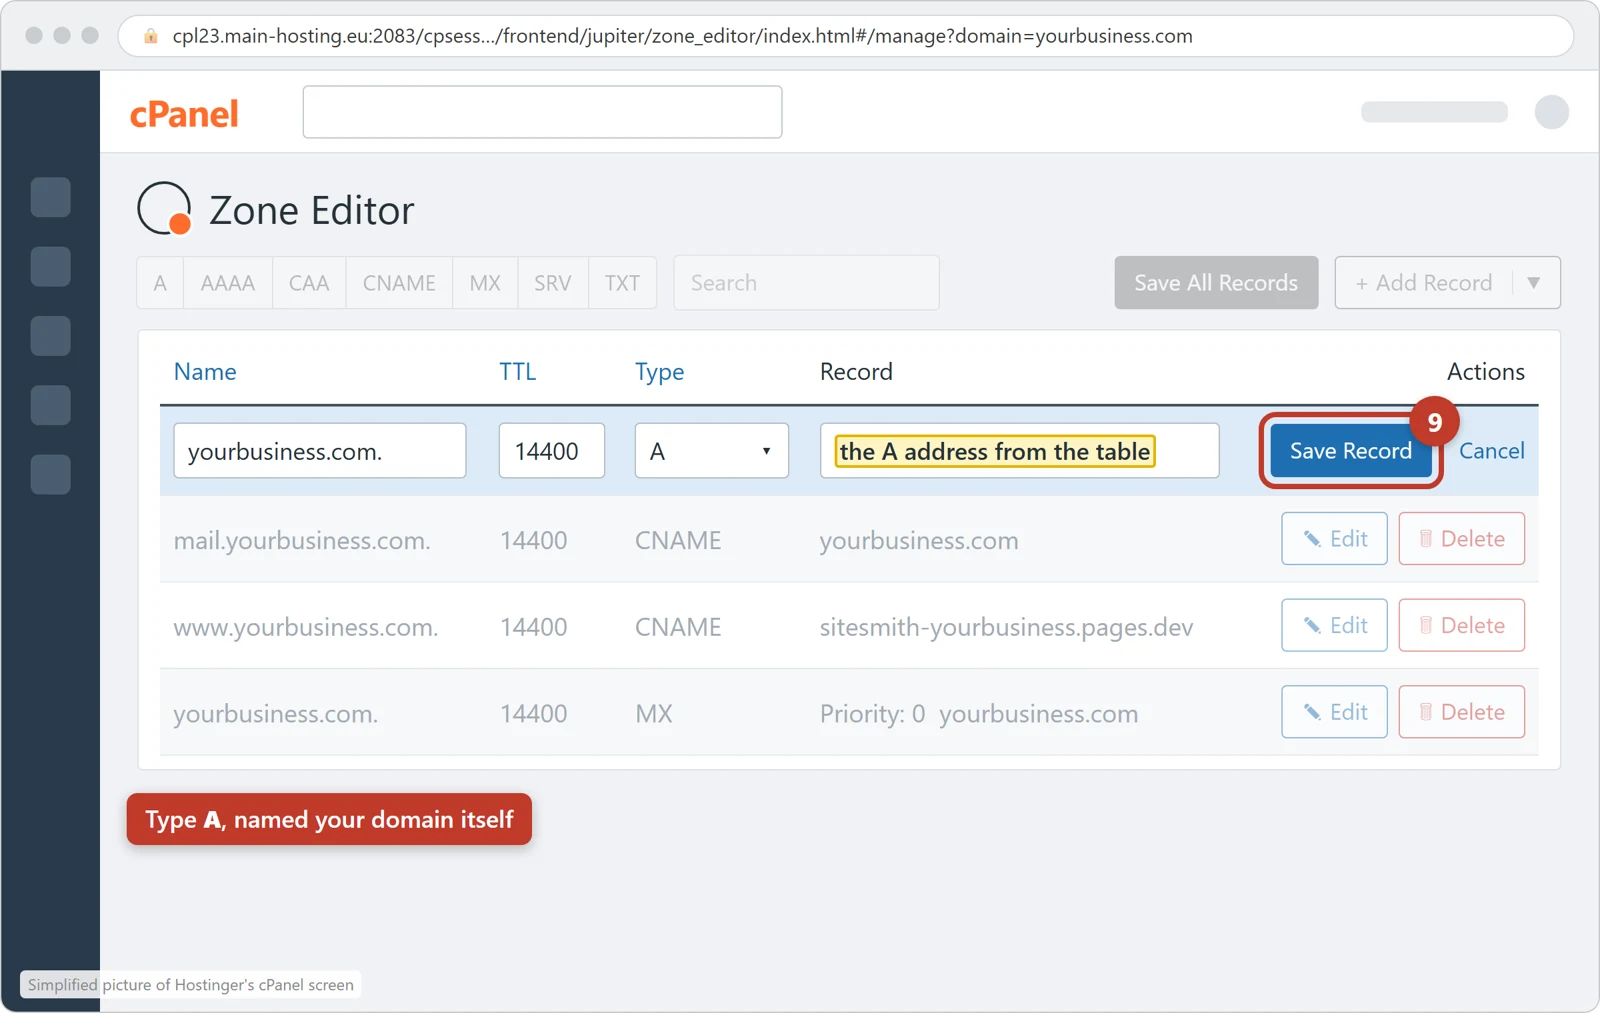
Tap the picture to see it bigger. Start the AAAA line
Look down the Type column. Is there already an AAAA line with your domain as its name? Then click Edit on it, paste the AAAA address from the table above into Record, click Save Record, and go to the last step.
No AAAA line? At the top right, click the small arrow ▼ next to + Add Record, then Add “AAAA” Record. A new light-blue line appears at the top of the list.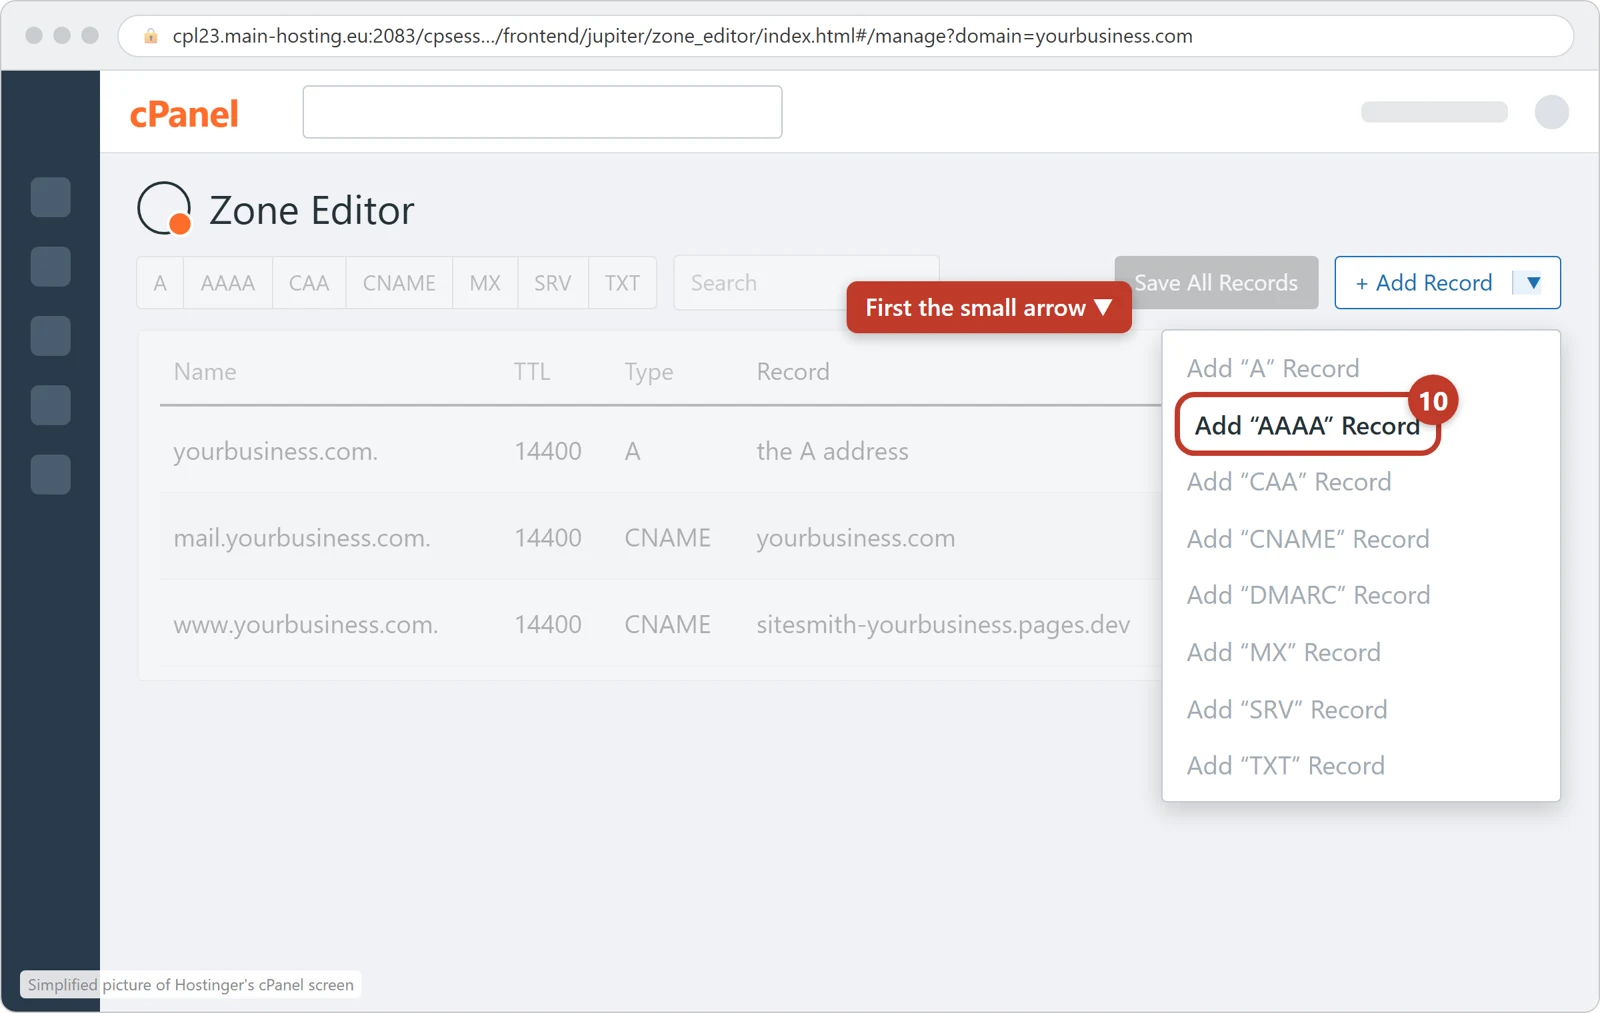
Tap the picture to see it bigger. Fill in the AAAA line
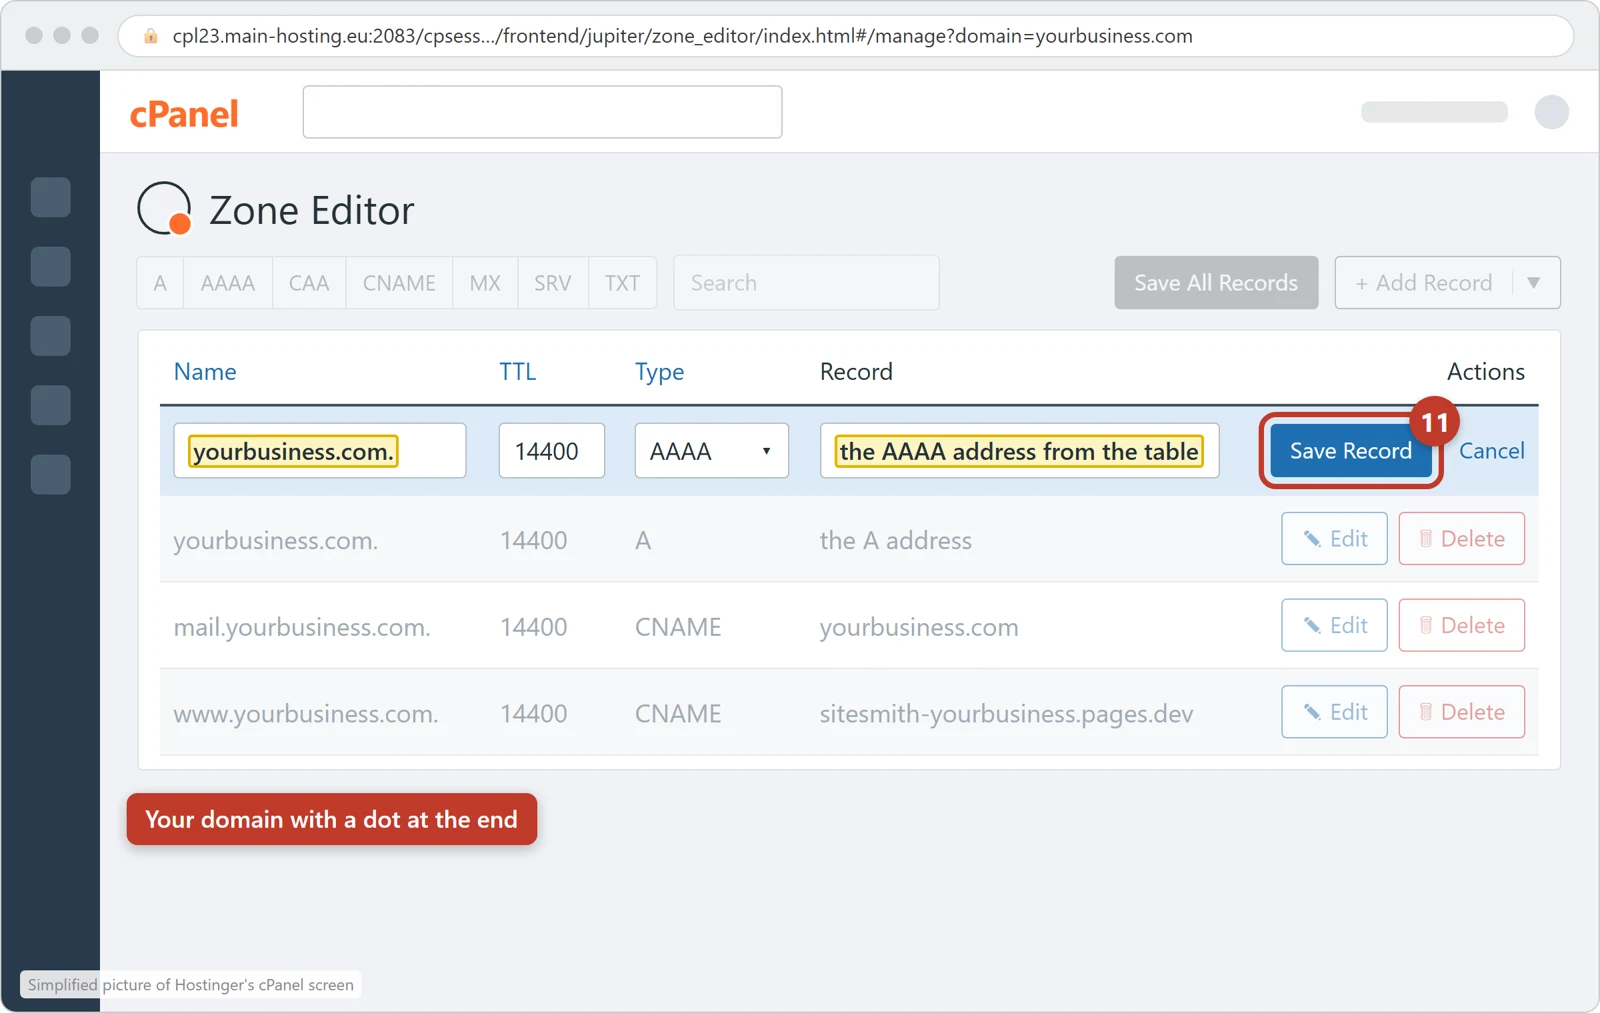
In the Name box, type your domain with a dot at the end, like yourbusiness.com. In the Record box, paste the AAAA address from the table above. Leave TTL as it is. Click Save Record.
Tap the picture to see it bigger. Check it in your panel
Go back to your panel, open the Domain tab and click Check my settings again. Each setting says done once the internet sees it, often within minutes, sometimes up to an hour, even though Hostinger mentions up to 24 hours. We email you the moment your new site shows on your domain.
Good to know
Make these changes in cPanel only. On this kind of Hostinger plan, the DNS page of the Hostinger dashboard does not control your domain; cPanel's Zone Editor does.
Do not change your nameservers, or any line of type MX or TXT. Those carry your email.
Leave the lines named mail, webmail, ftp or cpanel as they are, even when they point to your domain.
Keep your Hostinger cPanel hosting until your new site shows on your domain. If your email is at Hostinger, keep the plan that carries it.
Stuck, or not sure?
Open the Help tab in your panel and write what you see, in your own words. We answer within minutes and walk you through it.
Changed your mind? Your panel keeps today's settings. Put them back at Hostinger (cPanel) and your old website returns, usually within an hour. If you turned off a forwarding or a connection on the way, turn it back on too.
Based on Hostinger's own help pages: How to access Hostinger dashboard, How to log in to cPanel at Hostinger, How to add and remove A records in cPanel at Hostinger, How to add and remove TXT records in cPanel, How to set up DMARC on cPanel at Hostinger, Hostinger cPanel: Manage MX records, How to set up a domain for cPanel Email at Hostinger, cPanel documentation: Zone Editor. The pictures are our own simplified drawings of Hostinger's screens, not copies of them; Hostinger's screens may look slightly different. Hostinger is a trademark of its owner; SiteSmith is not affiliated with Hostinger. Last checked 2026-10-26.